Tech Tips — Mortise improvements
The accuracy and consistency of your key bushing job are greatly affected by the condition and
uniformity of the key mortises. Here are three ways to improve mortises and enhance the end result:
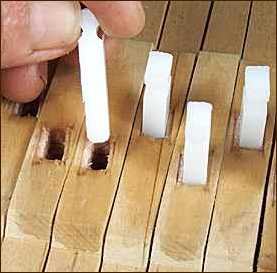
Ensure uniform mortise widths with our Mortise Sizing Cauls
The moisture used to remove the old bushings will swell
and distort most mortises. In addition, mortises in many
keys were crudely manufactured in the first place. To
size them all uniformly, insert these cauls into the
mortises immediately after removing the old bushings
while the wood is still wet, then allow the keys to dry
thoroughly. All mortises will be sized exactly the same,
and the previously soft, swollen wood will be compacted
to a smooth, dense and stable base for gluing in the new
bushings. Key easing will be minimized and bushing
stability will be enhanced.
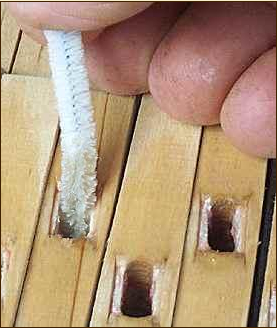
Glue prime mortises prior to rebushing
A thin primer layer of glue will firm up soft, splintered
wood and improve adhesion of your new bushing cloth.
Just before starting to rebush, pour off a little of your
hot hide glue into a small container and thin to about the
consistency of milk. Keeping this mixture hot in your glue
pot, use a large 1/4" (craft store type) pipe cleaner to
swab each mortise with this glue primer coat. Lean the
applicator from side to side to coat the "shoulder" areas
on each side of the mortise on front rails or balance rails
with shoulders as shown here. I prefer to do this after
the mortise sizing cauls have been used.
You can proceed immediately to rebush.
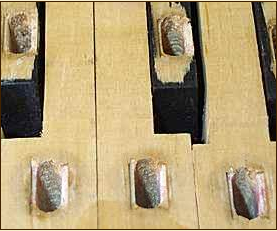
Rout new front rail shoulder recesses
On many American made keys, the front rail bushing
shoulder recesses on either side of the mortise were
made by compressing the wood rather than by
machining. The moisture used to remove the old bushings
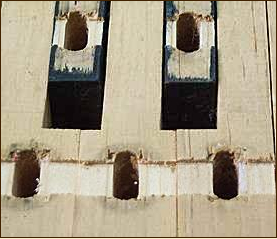
swells these compressed areas, leaving recesses that are
too shallow and uneven in depth as shown at right. This
causes the new bushings to protrude below the bottom
surface of the keys, causing poor bushing adhesion as
well as spongy key dip when the bushing shoulders
contact the front rail punchings.
A new recess can be easily formed by routing. Just use a
3/8" straight or spiral bit in a table mounted router, with
a fence set to center the cut on the mortises and a depth
of cut equal to the cloth thickness. Three or four keys
can be run across the bit at once.
Always use a push block to hold the keys square and to
prevent chipping as the bit exits the last key.
Rout all the naturals, then reset the fence and do the
sharps.
This step only takes a few extra minutes, but makes for
a much neater end result. Since the routing exposes new
fresh wood, always apply glue primer as explained
above before rebushing.
top of page